April 16, 2025
How to Cut and Hang Drywall
While hanging drywall can seem intimidating, with the right tools and techniques, it’s not as difficult as you might imagine. Drywall—also known as wallboard, plasterboard, and by the trade name Sheetrock®—is made from gypsum cement that is covered with paper to give it added strength and a smooth surface.
Drywall comes in thicknesses ranging from 1/4” to 3/4”, with 1/2” being the most common. Standard sizes are 4’ x 8’ and 4’x 12’ though 54” widths are available for use on 9’ ceilings.
While longer sheets are heavier and hard to deal with, they reduce the number of joints, making finishing easier.
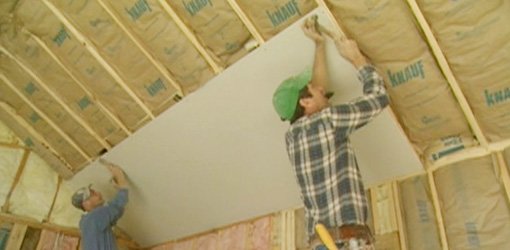
Since lifting heavy sheets can be a challenge, consider renting a drywall lift, such as PanelLift, when hanging ceilings.
Apply drywall to the ceiling first then the walls, with long sides at right angles to the framing and the ends centered on studs.
Drywall Tools
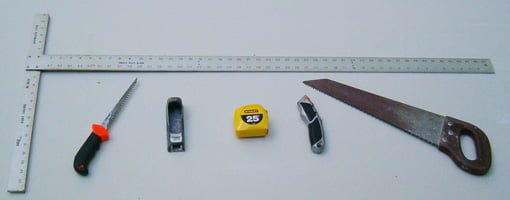
Only a few simple tools are needed to cut drywall:
- Measuring tape
- Utility knife
- Straight edge
- Drywall saw
- Drywall keyhole saw
- Drywall rasp or sanding block

Cutting Drywall
Drywall can be cut by either scoring or sawing. Scoring is best for cutting sheets to length or width while sawing is used to cut holes and openings for windows and doors.
1. Scoring
Scoring is the easiest and least messy method of cutting drywall. Here's how to go about it.
Step 1: Score Front of Drywall Panel
Using a straight edge or chalk line as a guide, cut through the paper and into the gypsum core on the face side of the drywall sheet with a sharp utility knife.
Step 2: Break Along Scored Line
While supporting the drywall sheet on the back, apply pressure to the face, causing the piece to break cleanly along the joint.
Step 3: Cut Through Paper on Back of Drywall Sheet
Score the paper on the back of drywall sheet with a utility knife to complete the cut.
Step 4: Smooth Cut Edge of Drywall with Rasp
If needed, use a drywall rasp or sanding block to smooth the cut edge.
2. Sawing
A drywall saw is used to make cuts for windows and doors while a smaller keyhole saw is perfect for cutting around electrical boxes and other small openings.
Make the cuts from the front side when possible to keep from roughing up the paper on the face.
When marking the locations for cuts, follow the old carpenter’s adage of measuring twice and cutting once to avoid making costly mistakes.
Since drywall is cut around doors and windows before the casings are attached, a perfect fit isn’t necessary. While professional drywall hangers often use a special high-speed rotary tool to cut around openings with the sheet in place, most do-it-yourself projects will involve measuring and cutting the sheet before it is installed.
Start by measuring horizontally from the corner of the room to the edge of the jamb and transfer the measurement to the drywall. Mark the waste side with an “X” to keep from accidentally cutting the wrong piece.
Next, measure vertically down from the ceiling or up from floor and transfer that measurement to the sheet as well.
Mark the drywall on the face with a straightedge and make the shorter of the two cuts with the drywall saw. Next, score the other line and snap off the cut piece.
The holes for electrical boxes need to be a tighter fit than those around windows and doors. The most common method is to measure and mark the location of the cutouts, then draw the outline on the sheet using an extra electrical box as a guide.
Another method is to rub a tube of lipstick around the edge of the box, hold the sheet in place, and press it against the box to transfer the outline to the drywall.
Step 1: Mark Drywall for Cutout Using Electrical Box
After determining the location of the electrical box on the drywall sheet, use an extra box as a pattern for the cutout.
Step 2: Cut Electrical Box Opening with Drywall Keyhole Saw
After marking the location of the electrical box, use a course tooth, drywall keyhole saw to cut out the opening.
Once the location has been marked, cut around it with a keyhole saw by plunging the sharp point into the sheet. Hold the blade at an angle so the cutout is slightly larger on the back than on the front.
Put the sheet in place and use a utility knife to adjust the fit around the box if needed, keeping the gap 1/8” or less.
Hanging Drywall
Drywall can either be nailed or attached using drywall screws. While nailing is faster, nails tend to work out over time, leaving unsightly bulges in the finished wall. Drywall screws not only stay put, but hold better, so not as many are needed.
Use 1¼” ring shank drywall nails when nailing 1/2” drywall. A crown-head hammer is used to drive the nails below the surface and denting the drywall without tearing the paper. Position nails 1/2” from the edge and every 7” for ceilings and 8” for walls.
When attaching drywall with screws, use 1¼” bungle head drywall screws. A drill equipped with an adjustable clutch is used to drive the screws just below the surface without breaking the paper.
Locate screws ½” in from the edges and every 12” for ceilings and 16” for walls. Construction adhesive can be applied to the studs first to give an even stronger bond while reducing the number of screws or nails.


Drywall Tips
Here are a few helpful tips to make your drywall project go more smoothly:
- Have a helper on hand to help with the heavy lifting.
- Use a pencil for marking, since a pen or marker may bleed through paint.
- Keep a sharp blade in the utility knife to cut the paper cleanly.
- Have a trash can nearby for scraps.
- Take breaks and don’t try to do too much, since most mistakes occur when you’re tired.

Doing a good job hanging the drywall will result in less work finishing and a better looking completed project.
Learn More About Walls For Your Home
- How To Cut And Hang Drywall
- How To Patch A Hole In Drywall Using A Hot Patch
- How To Repair Damaged Drywall
- How To Hang Wallpaper
- How To Cut And Hang Drywall
- How To Stop Salt From Coming Out Of The Wall
- Repairing Damaged Corners In Drywall
- How To Repair A Popped Nail In Drywall
- The Easy Way To Install A Shiplap Wall
- How To Remove Thinset
- How To Fix Uneven Walls
- Levels Of Drywall Finishes
- Identifying Defective Chinese Drywall
- Shiplap Vs Drywall
- Toxic Chinese Drywall Is It In Your Home
- What Is The Difference Between Sheetrock And Drywall
- Patching A Hole In Drywall
- What Is A Corner Bead
- Should You Caulk Baseboards
- Should You Insulate Interior Walls
- How Much Weight Can Drywall Hold
- Plaster Vs Drywall
- Bad Drywall Job
- How To Repair Small Holes In Drywall
- Purple Vs Green Drywall
- Problems With Drywall Nailhead Pops And Rust Stains On Walls And Ceilings
- Dry Rot
- High-End Wallpaper Brands 101
- Half Wall Vs Railing
- The Drywall Guru Offers Expert Advice
- Drywall Shorty Gives Some Guidance
- National Gypsum Specialized Drywall For All Rooms
- What To Do About Wet Drywall
- Cutting Drywall Around Outlet Boxes
- Installation
- Taking Down Walls
- Shower Wall Options
- Wall Paneling Uses
- 5 Ways To Enhance Your Home's Walls
- How To Retrofit Drywall To Practically Soundproof Your Home
- All About National Gypsum Drywall And Plaster
- Floor Wall Ceiling Registers
- Quartz Wall Cladding
- Diy Drywall Sponge Mop Pole Sander
- Metrie Moulding
- Wood Wall Panels
- Exterior Wall Sheathing
Further Information
- Cutting Drywall Around Outlet Boxes (video)
- How to Repair Damaged Drywall (video)
- How to Repair Small Holes in Drywall (article)
- How to Patch a Hole in Drywall Using a Hot Patch (article/video)
- How to Repair a Popped Nail in Drywall (video/article)
Latest Content About Wall Installation & Repair
How To Fix Drywall Nail Pops and Rust Stains on Walls and Ceilings
October 30, 2024
What is Corner Bead and Where You Might Need It?
October 30, 2024
A Quick Guide to Proper Placement of Registers in an HVAC System
October 31, 2024
Metrie – Manufacturer Spotlight
March 10, 2025
Half Wall vs. Railing: A Guide
March 14, 2025
6 Wall Paneling Uses for Commercial Spaces
March 20, 2025


